Senin, 09 Juli 2012 @ 06.34
This might seem pretty obvious to some people, but you’d be surprised at how many lovely ladies don’t clean out their hair brushes. Too often I walk into a friend’s bathroom, see a brush full of hair and I can’t help myself, so I clean it out. Within the next couple days I usually hear about how much it changed the way their hair looks. It may not seem like a big deal but hair brushes are total traps! Dust, conditioner, oil, germs, even dust mites can be in your dirty hair brush, which is DISGUSTING. For example: if you wash, brush and blowdry your hair on a Monday and then “re-finish” it on Tuesday with the same brush, the oils and dirt from all day Monday will be sitting in that brush. Pile those up for a couple weeks, months… years? Ew. Personally, I recommend you clean out your brush once every week or two. It takes a couple minutes! It’s not something we really think about but you should try to become conscious of the hair piling up in your brush. Cleaning out your round brushes will allow you to get SO much more tension which will lead to smoothness and shine. Here’s how I like to clean out my brushes at home:
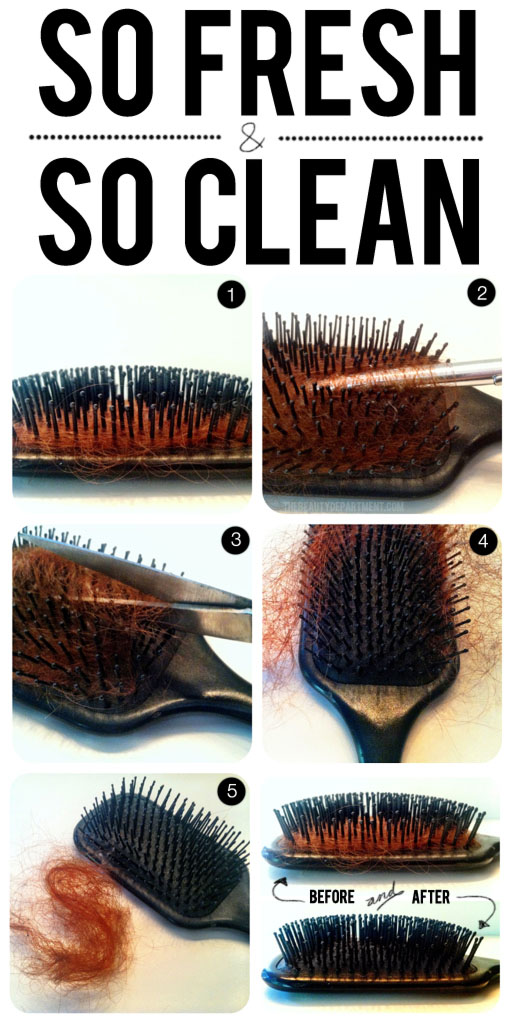
- Grab any brush that’s gathered a visible amount of hair. Here I’m showing you how to clean out a flat (paddle) brush but this can be done exactly the same on a round brush.
- In the hair world, we have tools to clean out brushes, but when I’m at home I grab a pen or pencil and slide it under the hair in the brush. Now pull up until the hair starts to loosen. (You do this so you don’t end up cutting your bristles with the next step!)
- Next, go in with your scissors and cut straight down the middle as seen above. TIP: If you’re cleaning out a round brush, flip it over and do the same on the opposite side.
- Now “peel” the hair open and remove. You can go back in with your pen or pencil to loosen up any more tight spots.
- Discard that gorgeous hairball.
- I like to shampoo my brushes each time I clean out the hair. To do that, just fill up the sink with warm water and add a tablespoon of cleansing/clarifying shampoo. Wash the brush + bristles thoroughly, rinse well, and let it dry (or blow it dry).
Label: beauty, brushes, clean, cleaning, diy, hair, pretty, tips
Jumat, 15 Juni 2012 @ 00.29

Don’t you just want to cry when you drop your brand new compact and the powder shatters into a million little pieces? But wait! Don’t throw it out and call your losses. You can absolutely put humpty dumpty back together again! And while you’re at it, grab your old cream shadow, blush or liner that has dried out, cracked or shrunk and bring it back to life too. Here’s how to do both:
POWER TOOLS: 70% alcohol {it works 1000 times better for this than your typical rubbing alcohol from the drug store and can be purchased at your local art supply}, plastic wrap, spatula, dropper, synthetic eyeliner brush {I used this favorite go-to liner brush for its round edges and stiff short bristles}, Q-tip {optional if you’re a perfectionist… you know who you are!}
WRAP IT UP: Completely cover the compact with the plastic wrap and make sure it adheres tightly to contain everything.
MASH IT UP: With your spatula, crush up the entire pan of shadow, not just the broken pieces. You essentially are turning the pressed powder back into loose powder.
ADD ALCOHOL: Remove the wrap and add at least 10 droppers full of alcohol. You can add a few droppers full at a time to see how much you need. I used a dozen.
SMOOTH IT OVER: Now you’ll feel the powder has become sponge-like and very pliable, giving you the perfect opportunity to even it out smoothly with your spatula.
PERFECT THE EDGES: Use your eyeliner brush to smooth it out even further. Give it a few hours to completely dry and it’s like it never happened! To make it extra pretty, clean up the perimeter with a Q-tip
. 
To revive your dried-out and cracked old cream shadow, apply the same steps except there’s no need to wrap it up or mash it up. Just add alcohol to reactivate it, stir it, smooth it out and perfect the edges. If you’re like us, you hate waste and these are two great ways to save and use what you have!
Label: alcohol, beauty, diy, girls talk, important, make up, must read, products, tips
|
Senin, 09 Juli 2012 @ 06.34
This might seem pretty obvious to some people, but you’d be surprised at how many lovely ladies don’t clean out their hair brushes. Too often I walk into a friend’s bathroom, see a brush full of hair and I can’t help myself, so I clean it out. Within the next couple days I usually hear about how much it changed the way their hair looks. It may not seem like a big deal but hair brushes are total traps! Dust, conditioner, oil, germs, even dust mites can be in your dirty hair brush, which is DISGUSTING. For example: if you wash, brush and blowdry your hair on a Monday and then “re-finish” it on Tuesday with the same brush, the oils and dirt from all day Monday will be sitting in that brush. Pile those up for a couple weeks, months… years? Ew. Personally, I recommend you clean out your brush once every week or two. It takes a couple minutes! It’s not something we really think about but you should try to become conscious of the hair piling up in your brush. Cleaning out your round brushes will allow you to get SO much more tension which will lead to smoothness and shine. Here’s how I like to clean out my brushes at home:
- Grab any brush that’s gathered a visible amount of hair. Here I’m showing you how to clean out a flat (paddle) brush but this can be done exactly the same on a round brush.
- In the hair world, we have tools to clean out brushes, but when I’m at home I grab a pen or pencil and slide it under the hair in the brush. Now pull up until the hair starts to loosen. (You do this so you don’t end up cutting your bristles with the next step!)
- Next, go in with your scissors and cut straight down the middle as seen above. TIP: If you’re cleaning out a round brush, flip it over and do the same on the opposite side.
- Now “peel” the hair open and remove. You can go back in with your pen or pencil to loosen up any more tight spots.
- Discard that gorgeous hairball.
- I like to shampoo my brushes each time I clean out the hair. To do that, just fill up the sink with warm water and add a tablespoon of cleansing/clarifying shampoo. Wash the brush + bristles thoroughly, rinse well, and let it dry (or blow it dry).
Label: beauty, brushes, clean, cleaning, diy, hair, pretty, tips
Jumat, 15 Juni 2012 @ 00.29
Don’t you just want to cry when you drop your brand new compact and the powder shatters into a million little pieces? But wait! Don’t throw it out and call your losses. You can absolutely put humpty dumpty back together again! And while you’re at it, grab your old cream shadow, blush or liner that has dried out, cracked or shrunk and bring it back to life too. Here’s how to do both:
POWER TOOLS: 70% alcohol {it works 1000 times better for this than your typical rubbing alcohol from the drug store and can be purchased at your local art supply}, plastic wrap, spatula, dropper, synthetic eyeliner brush {I used this favorite go-to liner brush for its round edges and stiff short bristles}, Q-tip {optional if you’re a perfectionist… you know who you are!}
WRAP IT UP: Completely cover the compact with the plastic wrap and make sure it adheres tightly to contain everything.
MASH IT UP: With your spatula, crush up the entire pan of shadow, not just the broken pieces. You essentially are turning the pressed powder back into loose powder.
ADD ALCOHOL: Remove the wrap and add at least 10 droppers full of alcohol. You can add a few droppers full at a time to see how much you need. I used a dozen.
SMOOTH IT OVER: Now you’ll feel the powder has become sponge-like and very pliable, giving you the perfect opportunity to even it out smoothly with your spatula.
PERFECT THE EDGES: Use your eyeliner brush to smooth it out even further. Give it a few hours to completely dry and it’s like it never happened! To make it extra pretty, clean up the perimeter with a Q-tip
.
To revive your dried-out and cracked old cream shadow, apply the same steps except there’s no need to wrap it up or mash it up. Just add alcohol to reactivate it, stir it, smooth it out and perfect the edges. If you’re like us, you hate waste and these are two great ways to save and use what you have!
Label: alcohol, beauty, diy, girls talk, important, make up, must read, products, tips
|
Natasha ♥
YOU KNOW YOU LOVE ME

Hi there. I'm Natasha Diva, I'm 16 years old. Currently living in Jakaera, Indonesia. Well. I love pink, I'm girly, I'm simple, I'm good. Chocolate is my guilty pleasure. Late night dramas are my thing. I don't believe in monsters, but I suspect there's on in my closet eating up all my Chanel bags. A huge fan of PINK from Victoria's Secret. xo
What more can I say? (:
Twitter

|
|
|
|