Jumat, 30 November 2012 @ 05.24


Obsessed with this side-heavy look- and as you can see below it’s all over the red carpet. It’s kind of got this sort of 90′s feel to it which I’ve really been digging. The weight of the hair feels very a-symmetric and it takes a whole 15 min to create this look. Here’s how it’s done:
- Find your super-deep part. Try lining it up with the very outside of your brow first. If that feels like it’s just too much, go a little closer in and line up with the arch of your brow.This could potentially feel a little uncomfortable at first if you’re not used parting so far over. If you really hate having that deep side part or if your hair just won’t cooperate for some reason, try doing what I did on Lucy Hale below– see how I went on a diagonal? It starts a little closer to the center and then diagonally goes into a heavier part. This way you get all the weight of the hair on one side but it doesn’t feel overly swooped. Don’t be afraid to take a blowdryer to it to get it to behave!
- Use the finer side of a comb + some strong holding hairspray to make the side tight as you see in photo 2. Don’t over spray, you just want the hair close the head and the fly-aways to stay down. If you really wanted to go for a sleek side, you could gel it and give it that “shaved side” appearance which feels equally edgy + girly!
- Now split the hair diagonally from the back of the part to the opposite corner of your neck. Start the braid behind your ear and go down and around as you see in photo 3. Use a tiny clear elastic to secure the braid on the opposite side of your neck. This elastic will be hidden underneath the other side with all the hair.
- That’s it! Now you’re free to create whatever texture you want on the heavier side– smooth waves, messy waves, curl, straight, anything you like. Personally I like the messy waves with a little volume (like you see in the very top photo) but you really can do this using any natural texture.

Label: beautiful, christmas, fashion, hair, inspiration, looks, make up, must read, pretty, products, snow, winter
@ 05.13
hey guys! I am very soorryyyyyyyy because I haven't post anything in these past [maybe] 4 months :( I'm just really busy with school and my friends. I mean, I have a life. lol. well, today is the last day of November and November has been very kind to me. [well so do September and October I think]. November is a rainy month in my country, the weather is also a bit cooler than usual. we don't snow here. but it's alright, I still can feel the Christmas-y here. anyways, right now I want to talk about my favorite youtuber. I have lots of favorite youtuber, but now I want to share some of them who talk about fashion, or make up. enjoy.
Bethany Mota [macbarbie07]
Sineady Cady [themakeupchair]
Ingrid [missglamorazzi]
well my those three beautiful chicks are my favorite. their videos are cute, inspiring, and very easy to follow. the steps are simple and the looks are affordable and fit for teens like me. xo
Label: beauty, body, christmas, clean, cleaning, clothes, december, pretty, school, shopping, snow, sorry, winter, woah, youtube
Senin, 09 Juli 2012 @ 06.34
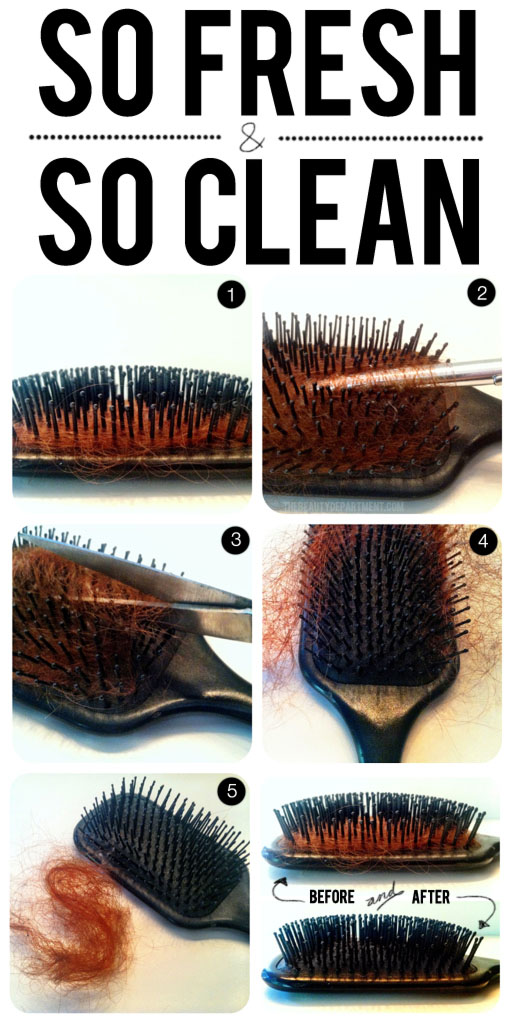
This might seem pretty obvious to some people, but you’d be surprised at how many lovely ladies don’t clean out their hair brushes. Too often I walk into a friend’s bathroom, see a brush full of hair and I can’t help myself, so I clean it out. Within the next couple days I usually hear about how much it changed the way their hair looks. It may not seem like a big deal but hair brushes are total traps! Dust, conditioner, oil, germs, even dust mites can be in your dirty hair brush, which is DISGUSTING. For example: if you wash, brush and blowdry your hair on a Monday and then “re-finish” it on Tuesday with the same brush, the oils and dirt from all day Monday will be sitting in that brush. Pile those up for a couple weeks, months… years? Ew. Personally, I recommend you clean out your brush once every week or two. It takes a couple minutes! It’s not something we really think about but you should try to become conscious of the hair piling up in your brush. Cleaning out your round brushes will allow you to get SO much more tension which will lead to smoothness and shine. Here’s how I like to clean out my brushes at home:
- Grab any brush that’s gathered a visible amount of hair. Here I’m showing you how to clean out a flat (paddle) brush but this can be done exactly the same on a round brush.
- In the hair world, we have tools to clean out brushes, but when I’m at home I grab a pen or pencil and slide it under the hair in the brush. Now pull up until the hair starts to loosen. (You do this so you don’t end up cutting your bristles with the next step!)
- Next, go in with your scissors and cut straight down the middle as seen above. TIP: If you’re cleaning out a round brush, flip it over and do the same on the opposite side.
- Now “peel” the hair open and remove. You can go back in with your pen or pencil to loosen up any more tight spots.
- Discard that gorgeous hairball.
- I like to shampoo my brushes each time I clean out the hair. To do that, just fill up the sink with warm water and add a tablespoon of cleansing/clarifying shampoo. Wash the brush + bristles thoroughly, rinse well, and let it dry (or blow it dry).
Label: beauty, brushes, clean, cleaning, diy, hair, pretty, tips
|
Jumat, 30 November 2012 @ 05.24
Obsessed with this side-heavy look- and as you can see below it’s all over the red carpet. It’s kind of got this sort of 90′s feel to it which I’ve really been digging. The weight of the hair feels very a-symmetric and it takes a whole 15 min to create this look. Here’s how it’s done:
- Find your super-deep part. Try lining it up with the very outside of your brow first. If that feels like it’s just too much, go a little closer in and line up with the arch of your brow.This could potentially feel a little uncomfortable at first if you’re not used parting so far over. If you really hate having that deep side part or if your hair just won’t cooperate for some reason, try doing what I did on Lucy Hale below– see how I went on a diagonal? It starts a little closer to the center and then diagonally goes into a heavier part. This way you get all the weight of the hair on one side but it doesn’t feel overly swooped. Don’t be afraid to take a blowdryer to it to get it to behave!
- Use the finer side of a comb + some strong holding hairspray to make the side tight as you see in photo 2. Don’t over spray, you just want the hair close the head and the fly-aways to stay down. If you really wanted to go for a sleek side, you could gel it and give it that “shaved side” appearance which feels equally edgy + girly!
- Now split the hair diagonally from the back of the part to the opposite corner of your neck. Start the braid behind your ear and go down and around as you see in photo 3. Use a tiny clear elastic to secure the braid on the opposite side of your neck. This elastic will be hidden underneath the other side with all the hair.
- That’s it! Now you’re free to create whatever texture you want on the heavier side– smooth waves, messy waves, curl, straight, anything you like. Personally I like the messy waves with a little volume (like you see in the very top photo) but you really can do this using any natural texture.
Label: beautiful, christmas, fashion, hair, inspiration, looks, make up, must read, pretty, products, snow, winter
@ 05.13
hey guys! I am very soorryyyyyyyy because I haven't post anything in these past [maybe] 4 months :( I'm just really busy with school and my friends. I mean, I have a life. lol. well, today is the last day of November and November has been very kind to me. [well so do September and October I think]. November is a rainy month in my country, the weather is also a bit cooler than usual. we don't snow here. but it's alright, I still can feel the Christmas-y here. anyways, right now I want to talk about my favorite youtuber. I have lots of favorite youtuber, but now I want to share some of them who talk about fashion, or make up. enjoy.
Bethany Mota [macbarbie07]
Sineady Cady [themakeupchair]
Ingrid [missglamorazzi]
well my those three beautiful chicks are my favorite. their videos are cute, inspiring, and very easy to follow. the steps are simple and the looks are affordable and fit for teens like me. xo
Label: beauty, body, christmas, clean, cleaning, clothes, december, pretty, school, shopping, snow, sorry, winter, woah, youtube
Senin, 09 Juli 2012 @ 06.34
This might seem pretty obvious to some people, but you’d be surprised at how many lovely ladies don’t clean out their hair brushes. Too often I walk into a friend’s bathroom, see a brush full of hair and I can’t help myself, so I clean it out. Within the next couple days I usually hear about how much it changed the way their hair looks. It may not seem like a big deal but hair brushes are total traps! Dust, conditioner, oil, germs, even dust mites can be in your dirty hair brush, which is DISGUSTING. For example: if you wash, brush and blowdry your hair on a Monday and then “re-finish” it on Tuesday with the same brush, the oils and dirt from all day Monday will be sitting in that brush. Pile those up for a couple weeks, months… years? Ew. Personally, I recommend you clean out your brush once every week or two. It takes a couple minutes! It’s not something we really think about but you should try to become conscious of the hair piling up in your brush. Cleaning out your round brushes will allow you to get SO much more tension which will lead to smoothness and shine. Here’s how I like to clean out my brushes at home:
- Grab any brush that’s gathered a visible amount of hair. Here I’m showing you how to clean out a flat (paddle) brush but this can be done exactly the same on a round brush.
- In the hair world, we have tools to clean out brushes, but when I’m at home I grab a pen or pencil and slide it under the hair in the brush. Now pull up until the hair starts to loosen. (You do this so you don’t end up cutting your bristles with the next step!)
- Next, go in with your scissors and cut straight down the middle as seen above. TIP: If you’re cleaning out a round brush, flip it over and do the same on the opposite side.
- Now “peel” the hair open and remove. You can go back in with your pen or pencil to loosen up any more tight spots.
- Discard that gorgeous hairball.
- I like to shampoo my brushes each time I clean out the hair. To do that, just fill up the sink with warm water and add a tablespoon of cleansing/clarifying shampoo. Wash the brush + bristles thoroughly, rinse well, and let it dry (or blow it dry).
Label: beauty, brushes, clean, cleaning, diy, hair, pretty, tips
|
Natasha ♥
YOU KNOW YOU LOVE ME

Hi there. I'm Natasha Diva, I'm 16 years old. Currently living in Jakaera, Indonesia. Well. I love pink, I'm girly, I'm simple, I'm good. Chocolate is my guilty pleasure. Late night dramas are my thing. I don't believe in monsters, but I suspect there's on in my closet eating up all my Chanel bags. A huge fan of PINK from Victoria's Secret. xo
What more can I say? (:
Twitter

|
|
|
|
